오늘의 학습 키워드

EditorWindow, CustomEditor


공부한 내용

CustomEditor

커스텀 에디터는 MonoBehaviour를 가진 스크립트를 타겟으로 하여 OnInspectorGUI 메서드를 사용하여 인스펙터에 커스텀으로 버튼, 레이블 등을 추가할 수 있는 기능이다.
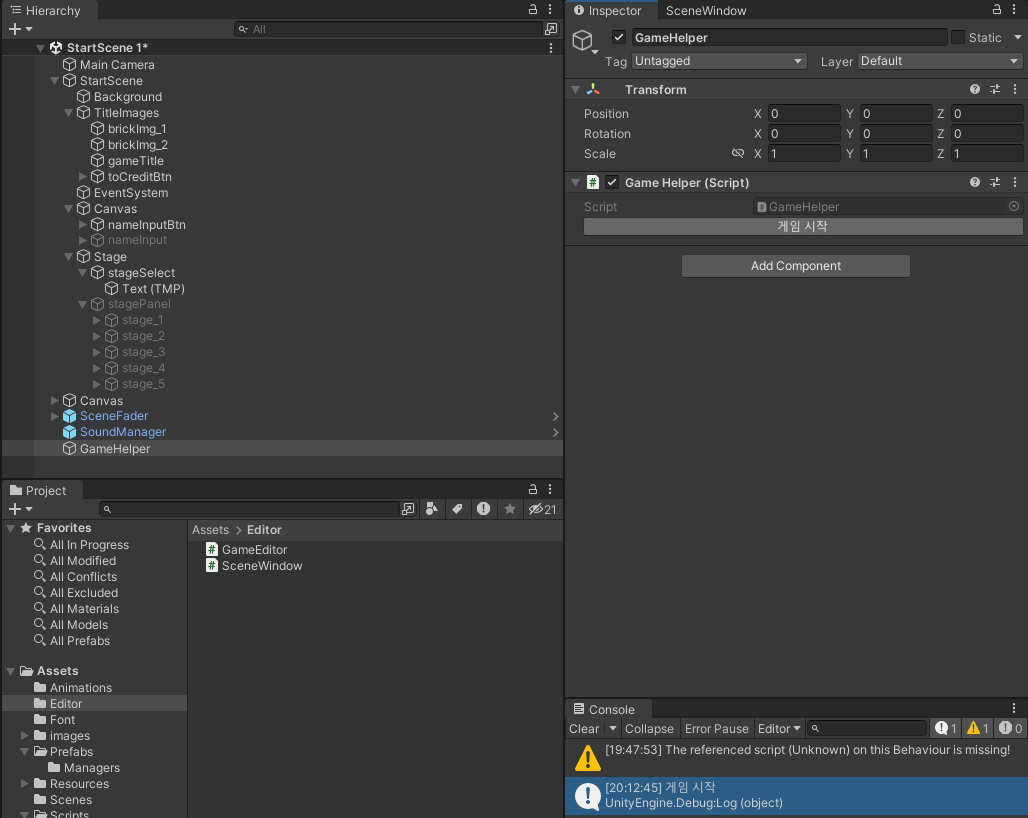
using System.Collections;
using System.Collections.Generic;
using UnityEditor;
using UnityEditor.TerrainTools;
using UnityEngine;

[CustomEditor(typeof(GameHelper))]
public class GameEditor : Editor
{
    public override void OnInspectorGUI()
    {
        base.OnInspectorGUI();

        if (GUILayout.Button("게임 시작"))
        {
            Debug.Log("게임 시작");
        }
    }
}


EditorWindow

에디터 윈도우는 따로 윈도우 창(탭)을 만들어 오브젝트에 종속되지 않고도(타겟을 정할 순 있음) 에디터를 커스텀 할 수 있는 기능이다.

이번 경우엔 CustomEditor보다 EditorWindow를 사용했다.

처음에 CustomEditor로 구현하다가 타겟을 정해야되는 부분에서 고민을 좀 했는데

씬을 이동하는 것을 구현하는 점에서 굳이 파괴될 수 있는 씬에 있는 오브젝트를 대상으로 타겟을 설정하는 것이 별로라고 생각했다.
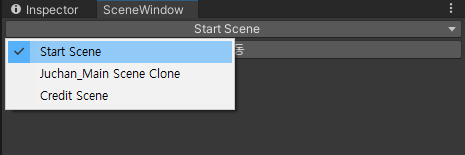
 

씬 이동에서의 문제점 1
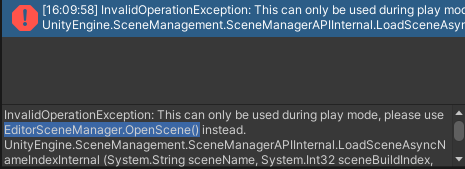
여기서 한 가지 문제가 있었는데 에디터 상에서 씬을 이동할 때는 EditorSceneManager.OpenScene()을 이용해야 한다는 점이었다. 플레이 모드에서 씬을 이동할 때는 SceneManager.LoadScene()을 사용해야하기 때문에 Applicaition.IsPlaying으로 분기 처리를 해주었다.

using System;
using System.Collections;
using System.Collections.Generic;
using UnityEditor;
using UnityEditor.SceneManagement;
using UnityEngine;
using UnityEngine.SceneManagement;

[Serializable]
public class SceneWindow : EditorWindow
{
    private const string PATH = "Assets/Scenes/";

    private SceneType _sceneType;

    [MenuItem("Helper/SceneWindow")]
    static void Init()
    {
        EditorWindow window = GetWindow(typeof(SceneWindow));
        window.maximized = true;
        window.Show();
    }


    private void OnGUI()
    {
        _sceneType = (SceneType)EditorGUILayout.EnumPopup(_sceneType, new GUIStyle(EditorStyles.popup) 
        { 
            alignment = TextAnchor.MiddleCenter,
        });

        if (GUILayout.Button("이동"))
        {
            if (Application.isPlaying)
            {
                SceneManager.LoadScene($"{PATH}{_sceneType}.unity");
            }
            else
            {
                EditorSceneManager.OpenScene($"{PATH}{_sceneType}.unity");
            }

        }
        
        if (!Application.isPlaying && GUI.changed)
        {
            EditorUtility.SetDirty(this);
            EditorSceneManager.MarkSceneDirty(EditorSceneManager.GetActiveScene());
        }
    }
}


씬 이동에서의 문제점 2

갑자기 씬이 안 넘어가지는 버그가 생겼다.

디버그를 해봤더니 버튼까지는 잘 동작되는 것을 확인할 수 있었다.

그래서 뭐가 문제인지 봤더니 저번에 공부했던 Time.deltaTimeTime.unscaledDeltaTime과 관련한 문제였다.

GameManager에서 게임이 끝나면 TimeScale을 0으로 만드는데 여기서 버그가 발생한 것이었다.

Time.deltaTime을 Time.unscaledDeltatime으로 바꾸고 해결하였다.

https://jcdevelop98.tistory.com/292


스파르타 Unity 8기 3일차 TIL

구현한 것들 간단한 오브젝트 풀링을 구현하여 터치 이펙트와 카드 파괴 이펙트를 구현하였다. using System.Collections; using System.Collections.Generic; using UnityEngine; public class ObjectPooler : MonoBehaviour { public

jcdevelop98.tistory.com

IEnumerator FadeIn()
{
    float alpha = 1.0f;
    while (alpha > 0)
    {
        alpha -= Time.deltaTime * fadeSpeed;
        fadeImage.color = new Color(0, 0, 0, alpha);
        yield return null;
    }

    OnLoadSceneByIndex(SceneManager.GetActiveScene().buildIndex);
}

IEnumerator FadeOut(int sceneIndex)
{
    if (isFadingOut)
        yield break;

    isFadingOut = true;

    float alpha = 0.0f;
    while (alpha < 1)
    {
        alpha += Time.deltaTime * fadeSpeed;
        fadeImage.color = new Color(0, 0, 0, alpha);
        yield return null;
    }

    SceneManager.LoadScene(sceneIndex);

    StartCoroutine(FadeIn());
}
IEnumerator FadeIn()
{
    float alpha = 1.0f;
    while (alpha > 0)
    {
        alpha -= Time.unscaledDeltaTime * fadeSpeed;
        fadeImage.color = new Color(0, 0, 0, alpha);
        yield return null;
    }

    OnLoadSceneByIndex(SceneManager.GetActiveScene().buildIndex);
}

IEnumerator FadeOut(int sceneIndex)
{
    if (isFadingOut)
        yield break;

    isFadingOut = true;

    float alpha = 0.0f;
    while (alpha < 1)
    {
        alpha += Time.unscaledDeltaTime * fadeSpeed;
        fadeImage.color = new Color(0, 0, 0, alpha);
        yield return null;
    }

    SceneManager.LoadScene(sceneIndex);

    StartCoroutine(FadeIn());
}


오늘의 회고

 오늘까지 기본 게임 로직을 거의 완성했다. 우여곡절이 많았지만 팀원 분들이 열심히 해주셔서 대충 거의 다 온 것 같다. 남은 건 추가 구현들과 버그 잡기만 남았다.

 내일은 아이템 구현과 최고점수 갱신 연결을 하려고 한다. 목요일까지 열심히 하자. 내일도 파이팅!

오늘의 학습 키워드

사운드 매니저


공부한 내용

사운드 매니저

BGM과 SFX를 나누어 사운드 매니저를 구현하였습니다.

음악 이름을 키 값으로 받고 value를 clip으로 받는 딕셔너리를 생성해 관리하도록 했습니다.

세팅 쪽 UI와 연결하여 음량이 변경되면 볼륨이 적용되도록 했습니다.

using System.Collections.Generic;
using UnityEngine;


public enum BGM
{
    MainMenu,
    InGame,
}

public enum SFX
{
    Break,
    Dead,
    LifeDown,
    OnHitBlock1,
    OnHitBlock2,
    OnHitBar,
}

public class SoundManager : MonoBehaviour
{
    public enum Sounds
    {
        BGM,
        SFX,
        MaxCount,
    }

    private static SoundManager _instance;
    public static SoundManager Instance { get => _instance; }

    private AudioSource[] _audioSources = new AudioSource[(int)Sounds.MaxCount];

    private const string BGM_PATH = "Sounds/BGM";
    private const string SFX_PATH = "Sounds/SFX";
    public Dictionary<string, AudioClip> ClipDict { get; } = new Dictionary<string, AudioClip>();

    void Awake()
    {
        if (_instance == null)
        {
            _instance = this;
        }
        
        DontDestroyOnLoad(gameObject);
    }

    private void Start()
    {
        Init();
        PlayBGM(BGM.InGame);
    }

    private void Init()
    {
        for (int i = 0; i < (int)Sounds.MaxCount; i++)
        {
            _audioSources[i] = gameObject.AddComponent<AudioSource>();
        }
        AudioClip[] bgms = Resources.LoadAll<AudioClip>(BGM_PATH);

        foreach (AudioClip clip in bgms)
        {
            ClipDict.Add(clip.name, clip);
        }

        AudioClip[] sfxs = Resources.LoadAll<AudioClip>(SFX_PATH);

        foreach (AudioClip clip in sfxs)
        {
            ClipDict.Add(clip.name, clip);
        }
    }

    public void PlayBGM(BGM bgm)
    {
        AudioSource audioSource = _audioSources[(int)Sounds.BGM];
        if (audioSource.isPlaying)
        {
            audioSource.Stop();
        }

        audioSource.clip = ClipDict[bgm.ToString()];

        audioSource.Play();
    }

    public void PlaySFX(SFX sfx)
    {
        AudioSource audioSource = _audioSources[(int)Sounds.SFX];
        if (audioSource.isPlaying)
        {
            audioSource.Stop();
        }

        audioSource.PlayOneShot(ClipDict[sfx.ToString()]);
    }

    public void SetBGMVolume(float value)
    {
        _audioSources[(int)Sounds.BGM].volume = value;
    }

    public void SetSFXVolume(float value)
    {
        _audioSources[(int)Sounds.SFX].volume = value;
    }
}


오늘의 회고

 오늘은 사운드 매니저와 리소스 연결 작업을 진행했다. 사운드 매니저는 다른 팀원 분이 하다가 내가 맡게 되었는데 내가 필요로 했던 부분을 미리 생각해놓고 있어서 그리 어려운 작업은 아니었던 것 같다. 우리가 만든 게임은 벽돌깨기 게임이고 아주 고전적인 게임이라서 리소스 찾는 작업에서 오래 걸리진 않았다. CC0인 에셋들도 존재해 사용할 수 있어서 다행이었다.

 내일은 아마 미리 먼저 아이템 쪽 구현을 하는 방향으로 생각 중이다. 아니면 다른 팀원분들한테 양해를 구하고 기본적인 로직을 짜는 것을 돕는 것도 고려중이다. 소통이 중요하니 어느 방향이든 팀에 도움이 되는 쪽으로 진행했으면 좋겠다. 내일도 파이팅!

한 주 회고

이번 주에는 지난 주 새로운 InputSystem을 사용해 게더 타운을 유니티로 만들어 보는 시간을 가졌다.

https://github.com/JeongJuChan/SpartaTown


GitHub - JeongJuChan/SpartaTown

Contribute to JeongJuChan/SpartaTown development by creating an account on GitHub.

github.com

Input System에서 SendMessage와 Invoke Unity Event의 차이를 알고 사용해 볼 수 있었다.

또한 UI 바인딩을 적용하는 방법과 업스케일링이라는 작업도 경험해보았다.


다음 주 목표

 다음 주는 벽돌깨기 팀 프로젝트를 완성하게 될텐데 계획했던 것을 모두 구현할 수 있었으면 좋겠다. 지난 주에 구현했던 것과 구현할 것 그리고 다른 팀원과 겹치는 부분에서 받아올 것 다 정리해놨으니 금방 작업만 하면 된다. 다음 주도 파이팅!

오늘의 학습 키워드

Visual Studio 자동완성, Awake vs OnEnable


공부한 내용

Visual Studio 자동완성

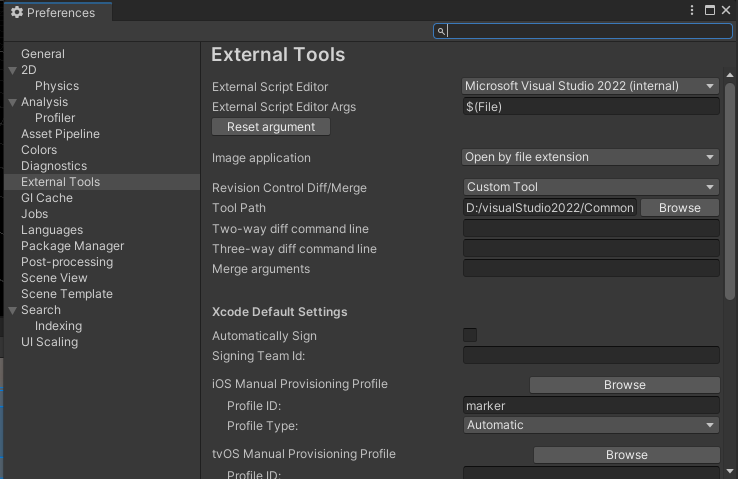
Edit - Preferences - External Script Editor의 항목이 internal로 뜨며 자동완성이 안될 때가 있다.

Browse를 눌러 Visual Studio 경로로 지정을 해보았으나 실패했다.

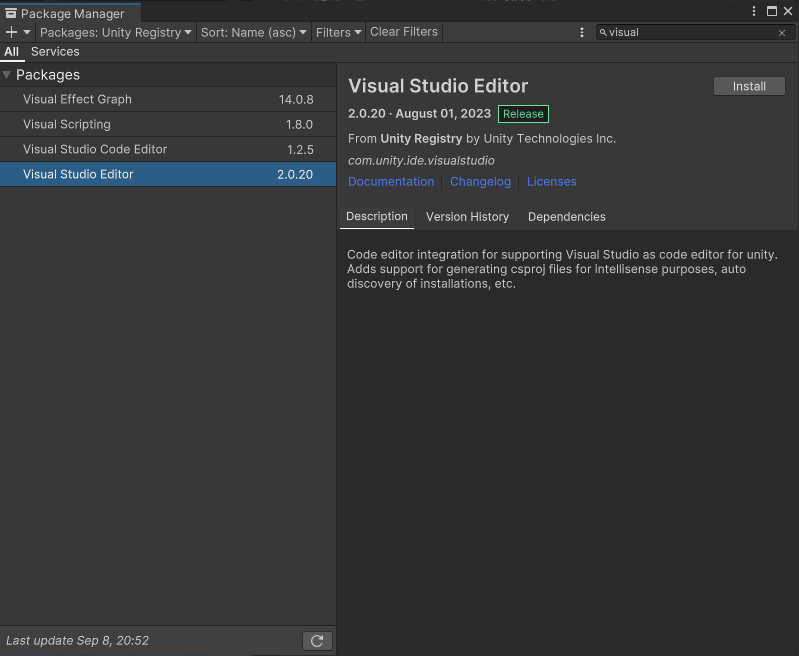
이번 경우는 Visual Studio Editor가 설치가 되어있지 않아서 생기는 문제였다.

패키지 설치 후 스크립트를 껐다 켰더니 되는 모습!


Awake vs OnEnable

UI매니저는 Awake에서 초기화하는 싱글턴이고 다른 스크립트는 OnEnable에서 이벤트 등록을 했는데 UI 매니저의 싱글턴 인스턴스가 null이라는 오류가 나왔다.

왜 Awake에서 초기화를 진행했는데 OnEnable에서 null일까 이상했다.

그래서 확인을 해보려고 싱글턴의 Awake와 다른 스크립트의 OnEnable에 중단점을 찍어봤더니 다른 스크립트의 OnEnable이 먼저 불린 경우였다.

이유를 알기 위해 검색을 좀 해봤더니 OnEnable동일한 스크립트에서만 Awake 뒤에 동작하는 것을 보장하고 다른 것은 그렇지 않다는 것이었다. Execution Order를 이용하여 호출 순서를 지정하거나 커스텀 메서드를 생성하여 싱글턴의 Awake가 불렀는지 체크하고 그 이후에 동작하도록 만들 수 있지만 Execution Order는 다른 스크립트도 꼬일 수 있어서 하지 않았고 커스텀 메서드는 지금 방식에서 그냥 Start를 이용하는 게 간편하다고 생각해서 Start로 옮겨 해결하게 되었다.

해결된 모습


오늘의 회고

 오늘은 팀 과제 발제가 있는 날이었다. 팀원들과 고전게임을 만들어 보는 과제였는데 우리는 닷지, 똥피하기, 벽돌깨기 중 벽돌깨기가 가장 안 해본 프로젝트에 가까워서 선택하기로 했다. 와이어 프레임도 그리고 필수 구현 기능과 추가 구현 기능으로 나눠서 필수 구현부터 팀원들과 분배하여 구현하였다. 오늘 필수 구현은 다 진행하였고 겹치는 부분을 제외하고서는 머지까지 완료했다. 협업이란 게 잘 되고 시너지가 잘 나서 능률이 올라가는 것 같아서 좋았고 재밌었다.

 이렇게만 계속 구현을 한다면 기획을 했던 것들을 다 구현할 수 있을 것 같아서 기대가 된다. 다음 주도 파이팅!


참고 :

https://forum.unity.com/threads/execution-order-of-scripts-awake-and-onenable.763688/


Execution Order of Scripts - Awake and OnEnable

I am facing issues related to scripts execution order and this point is out of my mind though I am an experienced, Unity developer. So I expect a...

forum.unity.com

https://docs.unity3d.com/ScriptReference/MonoBehaviour.Awake.html


Unity - Scripting API: MonoBehaviour.Awake()

Awake is called either when an active GameObject that contains the script is initialized when a Scene loads, or when a previously inactive GameObject is set to active, or after a GameObject created with Object.Instantiate is initialized. Use Awake to initi

docs.unity3d.com

https://docs.unity3d.com/ScriptReference/MonoBehaviour.OnEnable.html


Unity - Scripting API: MonoBehaviour.OnEnable()

Success! Thank you for helping us improve the quality of Unity Documentation. Although we cannot accept all submissions, we do read each suggested change from our users and will make updates where applicable. Close

docs.unity3d.com


오늘의 학습 키워드

UpScale Sampling


공부한 내용

UpScale Sampling

업 스케일링 샘플링 : UI는 원래 해상도로 하고 3D 씬만 낮은 해상도로 렌더링 하는 방법

- 해상도를 줄이면 픽셀이 도드라져 게임 유저가 저해상도임을 알아채기 쉬워서 나온 보완 방법


구현 방법

1. 카메라 2대가 필요하다(UI 카메라와 메인 카메라)

1-1 CullingMask 옵션에서 UI카메라는 UI만 찍게하고 메인 카메라는 UI를 제외한 부분을 찍게한다.

1-2 또한 UI카메라는 추가로 Clear Flags를 Depth Only로 해 두 대의 카메라가 동시에 렌더링 될 수 있도록 한다.

2. 렌더 텍스처를 담기 위한 캔버스하위의 RawImage를 하나 만든다.

3. 이후 업스케일링을 하기 위한 RenderTexture를 만들고 Raw이미지에 담는 작업을 구현한다.

using System.Collections;
using System.Collections.Generic;
using UnityEngine;
using UnityEngine.UI;

public class RenderTextureCreater : MonoBehaviour
{
    [SerializeField] private GameObject rtCanvas;

    public void CreateRT(float ratio)
    {
        int x = (int)(Screen.width * ratio);
        int y = (int)(Screen.height * ratio);

        var rt = new RenderTexture(x, y, 24, UnityEngine.Experimental.Rendering.DefaultFormat.HDR);
        rt.Create();

        Camera.main.targetTexture = rt;

        // RawImage는 Texture에 접근 가능
        RawImage raw = Instantiate(rtCanvas).GetComponentInChildren<RawImage>();
        raw.texture = rt;
    }
}

4. 마지막으로 버튼에 연결하여 동작시킨다.

4-1. 중요한 점은 업스케일링할 Canvas(만들어놓은 프리펩)의 Sort Order버튼 UI의 Sort Order보다 높아야한다. => 그래야 보임


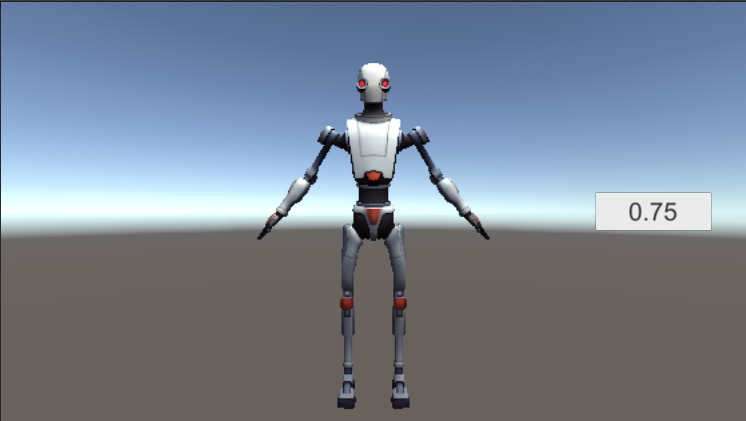
적용된 모습 (적용 전 -> 적용 후)

변경 후


오늘의 회고

 오늘은 개인 과제 제출이 있는 날이었다. 오전 중에는 구상은 해놓았지만 구현하지 못했던 것들을 구현하고 버그 잡고 Readme 쓰느라 정신이 없었던 것 같다. 오후에는 튜터님의 UI 강의를 듣고 Zep으로 레크레이션 시간을 가졌는데 꽤 재밌었다. 이후에 남은 시간에 업스케일링 부분이 있길래 공부해봤는데 나중에 최적화를 위해서 써먹어 봐야겠다.

 내일은 유니티 팀 프로젝트 과제 발제가 있는 날이다. 오전 중에 기획을 진행하고 구상하는 방식으로 팀원과 잘 의견을 공유해봐야겠다. 내일도 파이팅!


참고 :

https://github.com/ozlael/UpsamplingRenderingDemo


GitHub - ozlael/UpsamplingRenderingDemo: Upsampling Rendering is old school but common trick for low end devices.

Upsampling Rendering is old school but common trick for low end devices. - GitHub - ozlael/UpsamplingRenderingDemo: Upsampling Rendering is old school but common trick for low end devices.

github.com


대충 만든 자판

https://school.programmers.co.kr/learn/courses/30/lessons/160586


프로그래머스

코드 중심의 개발자 채용. 스택 기반의 포지션 매칭. 프로그래머스의 개발자 맞춤형 프로필을 등록하고, 나와 기술 궁합이 잘 맞는 기업들을 매칭 받으세요.

programmers.co.kr


처음에 고민이 되었던 게 tapCountArr라는 배열을 만들고 나서 0이라는 초기값과 값 중에서 어떻게 최소값을 가져올지가 문제였다.

이후에 int.MaxValue 프로퍼티를 일치하지 않는 값에 넣어준 뒤 최소값을 뽑아내는 방식으로 해결했다.

using System;
using System.Linq;

public class Solution {
    public int[] solution(string[] keymap, string[] targets) {
        int[] answer = new int[targets.Length];
int[] tapCountArr = new int[keymap.Length];

for (int i = 0; i < targets.Length; i++)
{
    for (int j = 0; j < targets[i].Length; j++)
    {
        for(int k = 0; k < keymap.Length; k++)
        {
            int index = Array.IndexOf(keymap[k].ToCharArray(), targets[i][j]);
            if (index != -1)
            {
                tapCountArr[k] = index + 1;
            }
            else
            {
                tapCountArr[k] = int.MaxValue;
            }
        }

        int min = tapCountArr.Min();
        if (min == int.MaxValue)
        {
            answer[i] = -1;
            break;
        }
        else
        {
            answer[i] += min;
        }
    }
}
        return answer;
    }
}


다른 사람의 풀이

딕셔너리로 최소값이면 value 값에 넣어주는 방식도 좋은 것 같다.

using System;
using System.Collections.Generic;

public class Solution {
    public int[] solution(string[] keymap, string[] targets) 
    {
        // dictionary에 최소값으로 넣어줌
        var dict = new Dictionary<char, int>();
        for(int i = 0; i < keymap.Length; i++)
        {
            string keyStr = keymap[i];
            for(int k = 0; k < keyStr.Length; k++)
            {
                char c = keyStr[k];
                dict[c] = dict.ContainsKey(c) ? Math.Min(k, dict[c]) : k;
            }
        }

        // dictionary에서 검색 후 출력
        int[] answer = new int[targets.Length];
        for(int i = 0; i < targets.Length; i++)
        {
            string targetStr = targets[i];
            for(int k = 0; k < targetStr.Length; k++)
            {
                if(!dict.TryGetValue(targetStr[k], out int index))
                {
                    answer[i] = -1;
                    break;
                }

                answer[i] += index + 1;
            }
        }

        return answer;
    }
}

체육복

https://school.programmers.co.kr/learn/courses/30/lessons/42862


프로그래머스

코드 중심의 개발자 채용. 스택 기반의 포지션 매칭. 프로그래머스의 개발자 맞춤형 프로필을 등록하고, 나와 기술 궁합이 잘 맞는 기업들을 매칭 받으세요.

programmers.co.kr


처음에 틀렸을 때는 배열을 정렬하지 않고 그냥 찾는 것으로 진행했다가 틀리게 되었다.

이후 배열을 정렬한 후 찾는 방식으로 해결하게 되었다.

using System;
using System.Collections.Generic;
using System.Linq;

public class Solution {
    public int solution(int n, int[] lost, int[] reserve) {
       int count = n - lost.Length;
        Array.Sort(lost);
        Array.Sort(reserve);
        
        for (int i = 0; i < lost.Length; i++)
        {
            if (reserve.Contains(lost[i]))
            {
                int index = Array.IndexOf(reserve, lost[i]);
                reserve[index] = -1;
                ++count;
            }
            else if (reserve.Contains(lost[i] - 1))
            {
                if (!lost.Contains(lost[i] - 1))
                {
                    int index = Array.IndexOf(reserve, lost[i] - 1);
                    reserve[index] = -1;
                    ++count;
                }
            }
            else if (reserve.Contains(lost[i] + 1))
            {
                if (!lost.Contains(lost[i] + 1))
                {
                    int index = Array.IndexOf(reserve, lost[i] + 1);
                    reserve[index] = -1;
                    ++count;
                }
            }
        }
        return count;
    }
}

옹알이 (2)

https://school.programmers.co.kr/learn/courses/30/lessons/133499


프로그래머스

코드 중심의 개발자 채용. 스택 기반의 포지션 매칭. 프로그래머스의 개발자 맞춤형 프로필을 등록하고, 나와 기술 궁합이 잘 맞는 기업들을 매칭 받으세요.

programmers.co.kr

처음에 틀렸던 부분이 j = -1 이 부분인데 이전에는 j = 0으로 했다가 1부터 시작하게 되어 0을 체크하지 못해 틀리게 되었다.

이후에 j = -1로 바꾸고 나서 해결하게 되었다.

using System;

public class Solution {
    public int solution(string[] babbling) {
        int result = 0;
        string[] speech = new string[] { "aya", "ye", "woo", "ma" };
        
        for (int i = 0; i < babbling.Length; i++)
        {
            string word = babbling[i];
            string preStr = "";
            for (int j = 0; j < speech.Length; j++)
            {
                if (preStr != speech[j] && word.StartsWith(speech[j]))
                {
                    preStr = speech[j];
                    word = word.Remove(0, speech[j].Length);
                    if (word.Length == 0)
                    {
                        result++;
                        break;
                    }

                    j = -1;
                }
            }
        }
        return result;
    }
}

숫자 짝궁

https://school.programmers.co.kr/learn/courses/30/lessons/131128


문제 제시가 0~9까지니까 X와 Y에 배열을 10칸 만들어놓고 시작한 게 도움이 됐던 것 같다.

또한 "0000" 이렇게 나왔을 때 그냥 int로 형변환 후 다시 string으로 변환하는 작업으로 풀었는데 조건에서 길이가 300만이라고 했는데 이를 모두 int로 변환하는 작업은 오래걸리기도 하고 메모리적으로도 문제가 있다. 그래서 이전에 선언한 배열에서 0의 개수를 세는 방식으로 바꿔서 해결하게 되었다.

using System;
using System.Text;

public class Solution {
    public string solution(string X, string Y) {
        string answer = "";
        StringBuilder stringBuilder = new StringBuilder();
        int[] xArr = new int[10];
        int[] yArr = new int[10];

        for (int i = 0; i < X.Length; i++)
        {
            xArr[X[i] - '0']++;
        }

        for (int i = 0; i < Y.Length; i++)
        {
            yArr[Y[i] - '0']++;
        }


        for (int i = 0; i < xArr.Length; i++)
        {
            int min = xArr[i] > yArr[i] ? yArr[i] : xArr[i];
            for (int j = 0; j < min; j++)
            {
                stringBuilder.Append(i);
            }
        }

        if (stringBuilder.Length > 0)
        {
            char[] cArr = stringBuilder.ToString().ToCharArray();

            Array.Sort(cArr, (x, y) => -x.CompareTo(y));

            answer = new string(cArr);
            bool isOnlyZero = true;
            for (int i = 1; i < 10; i++)
            {
                if (answer.Contains(i.ToString()))
                {
                    isOnlyZero = false;
                    break;
                }
            }

            if (isOnlyZero)
            {
                answer = "0";
            }
        }
        else
        {
            answer = "-1";
        }
        
        return answer;
    }
}

로또의 최고 순위와 최저 순위

https://school.programmers.co.kr/learn/courses/30/lessons/77484


프로그래머스

코드 중심의 개발자 채용. 스택 기반의 포지션 매칭. 프로그래머스의 개발자 맞춤형 프로필을 등록하고, 나와 기술 궁합이 잘 맞는 기업들을 매칭 받으세요.

programmers.co.kr


처음 풀었을 때는 0이 되는 경우와 아닌 경우를 나눠서 생각하지 못해 틀렸었는데

다시 문제를 보니 0아니 아니면 확정적으로 맞은 개수가 나오고 나머지 0에서 최고 최저를 가린다는 것을 알게 된 뒤 수월하게 풀 수 있었다. 특히 나는 배열로 맞춘 개수를 미리 넣어놓은 게 도움이 되었다.

using System;

public class Solution {
    public int[] solution(int[] lottos, int[] win_nums) {
            int correct = 0;
            int zeroCount = 0;

            int[] ints = new int[7] { 6, 5, 4, 3, 2, 1, 0 };

            for (int i = 0; i < lottos.Length; i++)
            {
                if (Array.Exists(win_nums, x => x == lottos[i]))
                {
                    correct++;
                }

                if (lottos[i] == 0)
                {
                    zeroCount++;
                }
            }

            // 최대 correct + zeroCount
            // 최소 correct

            int max = correct + zeroCount;
            int min = correct;

            if (max < 2)
            {
                return new int[] { 6, 6 };
            }
            else
            {
                if (min < 2)
                {
                    int maxIndex = Array.IndexOf(ints, max);
                    return new int[] { maxIndex + 1, 6 };
                }
                else
                {
                    int maxIndex = Array.IndexOf(ints, max);
                    int minIndex = Array.IndexOf(ints, min);
                    return new int[] { maxIndex + 1, minIndex + 1 };
                }
            }
    }
}

+ Recent posts